
Pinhole photography.
Pinhole photographs can be taken on a camera made specifically for that purpose, using film or photographic paper, or by modifying a plate camera, film camera or digital camera by replacing the lens with a pinhole.
Pinhole photographs have lower definition than a normal photograph but have a huge depth-of-field, and due to the tiny amount of light that gets through the pinhole, the exposure times can be long, if so the camera usually needs to be on a tripod or a firm surface.
On this page:
Pinhole photography using a Digital camera
Pinhole photography using a 4x5 format camera
 Digital pinhole camera |
 4x5 format pinhole camera |
Pinhole photography using a digital camera.
To make a test pinhole I wrapped some aluminium baking foil tightly over a Fujifilm 16mm extension tube and secured it with an elastic band. I then made a tiny hole in the centre of the foil with the pin. I fitted the pinhole extension tube to the camera, put the camera on a tripod and set the shutter speed to Auto. The image produce was awful.

I already knew that photos taken by a pinhole camera have a soft resolution but my image was very foggy. This I realised was due to flare caused by the reflection of light between the sensor and the aluminium foil because when the sun came out it was even worse. I also knew that the pinhole had to be perfectly circular for the best resolution, and that this could not be achieved with baking foil because the pin would have produced a ragged hole. But I was pleased that I had managed to create the sort of photo that would have been marvelled at around two hundred years ago.
I needed something more substantial than foil to create a pinhole in so I looked around my workshop and found a strip of 0.25mm-thick phosphor bronze.

I laid the strip on a piece of hard wood, took the smallest sewing needle that I could find, and tapped it with a small hammer until the point just broke through the metal. I measured the diameter of the needle as far as the point where it had entered the hole using a vernier caliper. It was about 0.2mm. Because the point of the needle had raised a tiny 'volcano' shape where it had exited the strip, I removed it using very fine emery paper.
I checked the pinhole with a magnifying lens. It seemed to be quite round and even. This is important as a ragged hole will produce diffraction effects. I trimmed the strip around the pinhole to make a disc about 15mm in diameter.

I drilled a 3mm hole in the centre of a spare Fujifilm body cap and glued the disc to the inside. I estimated the distance from the inside of the cap to the camera sensor to be about 23mm. This will give an equivalent focal length of 35mm on an APS-C camera, which is just what I wanted.
I tested it. There was still some flare, so I cut a disc of black felt with a 3mm hole in the centre and glued it around the pinhole to prevent possible reflections between the shiny metal disc and the sensor.

The result was an image that was much clearer than before and there was no flare. It still had a soft resolution, which was what I expected to see.
Photo: Fuji X-E1, approx 0.2mm pinhole, exposure 2.1 seconds ISO 800. Tripod.
I decided to try improving the quality even more. My pinhole was made 0.25mm-thick phosphor bronze shim I found out was much thicker than should be used. So I thinned down the centre of the disc quite a bit using fine emery paper. I was unable to measure accurately the thickness achieved at the very centre but it was probably around 0.1mm.
It did nothing to improve the resolution so I decided to buy an accurately manufactured pinhole.
At this point I did some investigation about pinhole sizes. For more details about the relationship between the pinhole size and the focal length go to my slightly more technical page here.

My new pinhole was a double-etched 0.2mm hole in 0.05mm-thick stainless steel disc bought from Pinhole Solutions.
I fixed it inside the body cap with a few tiny spots of glue at the edges and covered it with a black felt disc with the 3mm hole in the centre to prevent reflections.

This new pinhole improved the resolution markedly.
When I compared the field of view achieved with the pinhole-cap to that of my Fuji 23mm f2 lens and found that they were very similar.
Photo: Fuji X-E1, 0.2mm pinhole, exposure 1.4 seconds at ISO 200. Tripod.

I also tried the pinhole cap attached to a 16mm extension tube to increase the pinhole to sensor distance to about 39mm, giving an equivalent focal length of about 58mm on an APS-C camera. This did increase the exposure times but made it a better focal length for portraits. The subject was pleased by the soft resolution and the lack of wrinkles!
It could never be a true portrait lens though, because it does not have a shallow depth of field to throw the background out of focus because the depth of field of a pinhole is so huge, but it works fine with a plain background. To be strictly correct it cannot even be called a lens because it doesn't contain a lens.
Photo: Fuji X-E3, 0.2mm pinhole in 23mm focal-length body-cap, plus 16mm extension tube. 2 seconds, ISO 12800, Fujifilm Acros film simulation, one 60cm LED-tube ceiling light. Cropped square but not processed.

Photo: West Bay, Dorset. Fuji X-E3, 0.2mm pinhole body-cap, focal-length 23mm. 1/5 second, ISO 200, Fujifilm Velvia film simulation.
This photo was taken on 30 April 2023 and submitted for World Pinhole Photography Day which was on that day.
On World Pinhole Photography Day, pinhole photographers from all over the world take photographs and submit them to the World Pinhole Photography Day website.
The link below opens at page one of the four pages of UK photographs submitted for that day. Pinhole photos from around the world can also be seen.

Fujifilm X-E3 pinhole camera
Digital pinhole photos
click/tap to view a photo - click/tap again to return
All photos are straight from the camera with no post processing, except for perhaps, some cropping and some spotting (removal of spots). Dust on a sensor can show up as a tiny feint mark on an image but when using a pinhole, a particle of dust becomes a very conspicuous spot.


Pinhole photography using a 4x5 format camera with direct-positive black-and-white photographic paper.
After looking at the images submitted to the World Pinhole Photography Day website I couldn't help but notice the better resolution of the photographs that were taken with larger pinhole cameras. I wondered if it had something to do with the the increase in size of the surface receiving the images projected by the pinhole. My Fujifilm body-cap pinhole projects an image onto a digital sensor measuring about 24mm x 16mm, but the area of light sensitive film or paper receiving the image in a 4x5 pinhole camera is about 115mm x 90mm.
This type of camera can be completely home-made or made from a variety of objects such as a tin, a cardboard box or a wooden box. A darkroom or somewhere really dark is normally required to load the photographic paper and to develop the photo afterwards.
I thought about building one but I decided to buy one instead. I chose a Pinsta 4x5 format camera, which uses direct positive paper to produce the finished image. This camera has the added advantage of not needing a darkroom to develop the image, as it can be done in the camera. The camera can be loaded somewhere dark or a changing bag can be used to load it anywhere, and the image can be developed anywhere too.
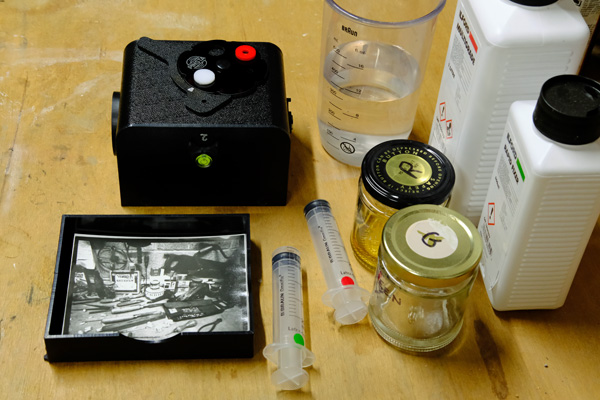
The camera is made of ABS and has been designed so that the back of the camera, where the photographic paper is held, becomes the developing tray after the exposure has been made. The developing and fixing chemicals can be injected into the tray of the closed camera, timed, and removed again using the syringes supplied. This only takes a few minutes. Once the fixer has been applied, the camera can be opened to reveal the image. It can then be washed to remove any trace of chemicals.
If using a darkroom the camera can be opened and the chemicals applied into the tray, the advantage being that the image can be seen developing (under a red darkroom light) and stopped when the it has reached the required density.
The recommended photographic paper, Ilford Harman Direct Positive Paper, produces quite contrasty images, so less contrasty subjects are easier to work with. The exposure times vary from between minutes on a sunny day to an hour on a very dull day, and several hours if indoors. It takes practice to get a good result, but the rewards are worth the effort. A print (still wet) can be produced within ten minutes of making the exposure if required.
Another thing to know is that the developed image will be reversed left to right. So, if necessary, the image can be copied with a digital camera or a scanner then reversed before being printed. This may seem a odd thing to do but the resulting image is still a photograph that was taken by a pinhole camera, just as a print produced from a negative by an enlarger is still a photograph that was taken by a film camera.
4x5 format pinhole photos
click/tap to view a photo - click/tap again to return
All photos are copies of the developed 4x5 prints, photographed with a Fujifilm APS-C camera using Fujifilm monochrome film simulation and have had no post processing except for cropping and reversing.


The link below opens at page one of the pages of UK photographs submitted for World Pinhole Photography Day 2024 which was on April 28th. Pinhole photos from around the world can also be seen.
Contact me here if you have a question or any advice.